Table of Contents
- Key Factors to Consider when Placing Sensors
- Bring Your Conserv Sensors (SCSs) Online
- Update Your Firmware
- Mount Your SCSs
- Evaluate the Range of the Sensors
- Test range for sensor with serial number c005999 and below
- Test range for sensor with serial number c006000 and above
- Paintable Sensors and 3D Printable Covers/Mounts
Key Factors to Consider when Placing Sensors
Here are key factors to consider:
- Monitoring Goals: Identify what data you need. Place Smart Collection Sensors (SCSs) near thermostats, doors, or display cases based on your goals. For loaned collections, check with institutions for placement requirements.
- HVAC System: Avoid placing sensors directly in front of intakes or vents to ensure accurate readings.
- Direct Sunlight: Keep sensors away from direct sunlight because it can skew temperature and humidity data.
- Freezing Temperatures: Some SCSs may not work well in extreme cold. SCSs are rated for freezing conditions, but they are not waterproof, and cold can reduce battery life. Click here for information about setting up sensors that are designed for cold environments.
- Gateway Range: Consider obstacles like walls and metal objects between the gateway and SCSs. Test SCSs placement for the best signal.
- Visibility and Security: Decide if you want SCSs visible to the public. For security, hide or secure them if necessary.
If you need help with placement, contact the Support Team for assistance.
Bring Your Conserv Sensors (SCSs) Online
When you are ready to place the sensors, pull the plastic battery tab from the back. A blue light should appear within 30 seconds, indicating that the sensor is starting up. You can activate them in their final location or near the gateway and move them later. After 10 minutes, data should begin showing in Conserv Cloud. Sensors are "live" if you see recent environmental data updates.
 If a sensor does not come online, it may be out of range. It will attempt to connect, then go into "sleep" mode if unsuccessful. To reset it, move it closer to the gateway and follow the instructions in this article.
Update Your Firmware
If you have received Conserv SCS sensors with serial numbers c006000 and above, make sure you are running the latest firmware. See this article to update your firmware. Your sensor does not need to be connected to the gateway for a successful firmware update. As long as it shows a blinking LED light and beeps when shaken, you may perform a firmware update. Firmware updates will reset the sensor and may automatically resolve any connectivity issues. Try updating the firmware before any other troubleshooting steps.
Mount Your SCSs
It can be helpful to note the serial numbers of sensors during installation to track their placement in each space.

Mounting Options

- Command Strips: Provided with each sensor and recommended for secure mounting. Avoid covering key areas like the reset button, screws, serial number, and LED light when applying the strip. Here are some instructions by 3M on how to use Command Strips.
- Magnets: SCSs come with 8x2mm Neodymium magnets for attaching to metal surfaces. If you are concerned about magnets detaching, use tape or stickers for extra security. If the magnets detach or the sensors drop and cause malfunctions, contact the Support Team for replacements.
For paintable sensor covers to match exhibition designs, reach out to Conserv!
Evaluate the Range of the Sensors
Test range for sensor with serial number c005999 and below
In Conserv Cloud, you can see a connectivity indicator on each sensor card that shows the "range."

This indicates how well the range is from the sensor to the gateway. Akin to your cell phone, it shows three bars if the range is good and as the bars disappear, the connectivity lessens. You can also see the last time the sensor was updated in Conserv Cloud. They should update every 15 minutes, but you may need to refresh the page.
Do not be deterred by one or two bars on your connectivity indicator. It is possible that you may still reliably connect. If you want to confirm this, you can check the data to see if it is complete (watch this video to see how).
If you want to use your sensors to experiment with range in your building, see this article.
If you see a lot of gaps in your data, you might want to move the gateway or sensor so they are closer in proximity. It also helps to put the gateway up higher in the room or the floor above so the signal does not have to go through as many materials to get from the sensor. If you still run into connectivity issues, contact the Support Team! They will help you troubleshoot the issue.
Test range for sensor with serial number c006000 and above
If your sensors have serial numbers above c006000, you may use the latest Conserv Cloud Mobile App to test range with a single button. See this article to test range using the app.
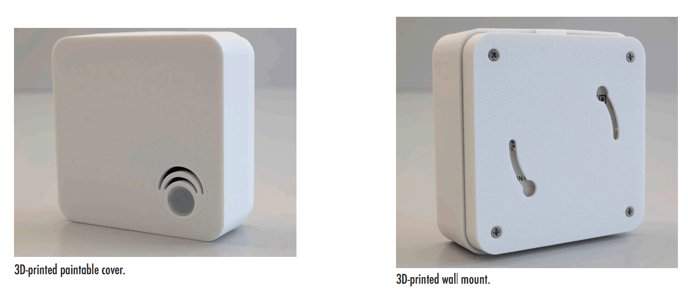
Paintable Sensors and 3D Printable Covers/Mounts
Conserv does not recommend painting your sensors directly because it can interfere with sensor calibration. However, there is a mountable model available designed by Jeffrey Warda at the Guggenheim. You may download the print files for the clip-on, paintable cover or the file for the back mount and print them yourself. Both may be used independently. We can also provide a link to print these files directly with Xometry, but you will need to request them directly in a support ticket, as we will need to send you a direct invitation. Detailed PDF instructions for mounting Jeffrey's design are also available upon request.
Note
The covers can interfere with light readings by blocking incidental light. If accurate light measurements are crucial, Conserv recommends avoiding extra covers or sanding the area near the sensor opening to make it more flush with the surface, ensuring minimal obstruction.