Congratulations! 🎉You've just made a giant step toward better preventive care for your collection by subscribing to Conserv's monitoring service!
Table of Contents
- Getting Prepared
- Set up in 2 minutes with this video
- Step 1: Set up your Conserv Cloud account
- Step 2: Open your Conserv equipment packages
- Step 3: Set up your Conserv Gateway
- Step 4: Find a Location for your Gateway with a Good Connection
- Step 5: Bring Your Conserv Sensors Online
- Step 6: Update the Firmware
- Step 7: Place Your Sensors
- Step 8: Evaluate the Range of the Sensors
Getting Prepared
Getting prepared for your Conserv package to arrive is simple. Here's a checklist.
- Login to your Conserv Cloud software account. Someone from your team should have been invited via email. If you are unsure about your account, please reach out to our support team.
- What spaces need to be monitored? A space is just what it sounds like: a place within your building that you need to monitor. This could be a storage area, a lab, a gallery, etc.
- Where are the sensors going to go in each space? It's best to place the sensor where your collections are. If you have one sensor for a space, you might select an area where collection storage is densest at a similar height to where things are stored. If you have multiple sensors, you may want to use the additional one to measure a potential microclimate where collections are stored (an area with lesser airflow, or an area that might be impacted by external temperature and humidity such as an external wall). If you have an RH/T sensor that can give you an immediate readout, you can walk around the space to observe if there are any large differences in your space to determine if there are microclimates where collections are stored that you want to watch a little closer. Some of our customers like to monitor near loaned objects or highly sensitive materials so that you can get good data on what those objects are experiencing. If you have questions about this do not hesitate to reach out! Our team of conservators have a lot of experience deciding on where to place sensors.
- Where am I going to put the gateways? The gateway is the heart of the system, and should be centrally located relative to the sensors so that the signal can get through. If your facility is particularly large or if there are some spaces that have lots of dense materials (metal shelving), it may take more than one. You're also going to need to place it in a location that has either good cellular coverage (closer to an external wall or window) OR near a router or ethernet port to create a hardwire connection. Be sure your IT department is on board with plugging in equipment if you choose to do this! Here are some frequently asked IT questions.
If you need some help deciding where things should go, Conserv's support team is ready to help! If you have a floor plan or building map you can share with us, all the better.

Set up in 2 minutes with this video
Step 1: Set up your Conserv Cloud account
This is the most important part of the process; you'll need to make sure you've gone into your account and gotten everything ready for your monitoring system to come online. You can take our free online course here. The course will serve as great resource to train other staff on the software.
💡If you'd like more information on any of these topics, don't hesitate to create a support ticket! We're always happy to walk you through any of these processes.
Step 2: Open your Conserv equipment packages
When you open your box(es) of Conserv equipment, you'll notice several different parts and attachments alongside your sensors:
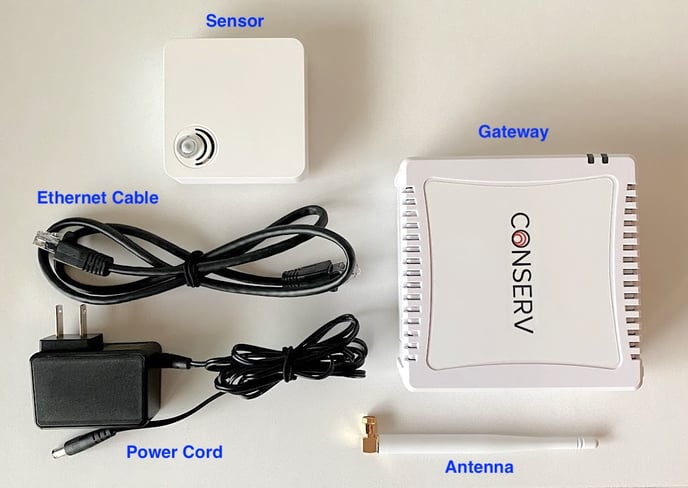
💡 Your package probably contains multiple Conserv sensors and might also contain water leak, outdoor temp/RH, or cold storage sensors.
Step 3: Set up your Conserv Gateway
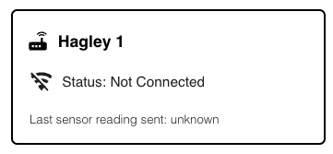
In order to start your monitoring system properly, you'll need to connect your Conserv Gateway first and make sure it's online. You'll notice on the Sensors dashboard in your Conserv account that you have a card for each of your gateways at the very bottom of the page. Once a gateway is connected, its card will update to reflect its connection (this can take a few minutes and may require a refresh).
Gateway isn't connected:
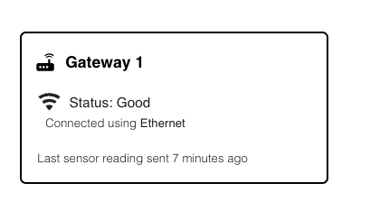
Gateway is connected:
NOTE: The cards for the gateways and sensors should show up in your account before you try connecting any of them. If you don't see anything please contact customer support by creating a support ticket.
To set up your gateway, first decide whether you are going to use your building's network or if you're using the gateway's built-in SIM card. If you're using a network, you'll need to attach the gateway to a port using the ethernet cable included in your Conserv box. If you're going to use cell service, you don't need to attach the ethernet cable. Many of our customers rely solely on the SIM card due to internet challenges. However, if it is possible to utilize the ethernet port, it can be helpful (from a network redundancy standpoint) for your gateway to utilize the hardwired connection alongside the SIM connection.
If your IT department has questions about connecting to your network, please refer to our Information Technology FAQ article.
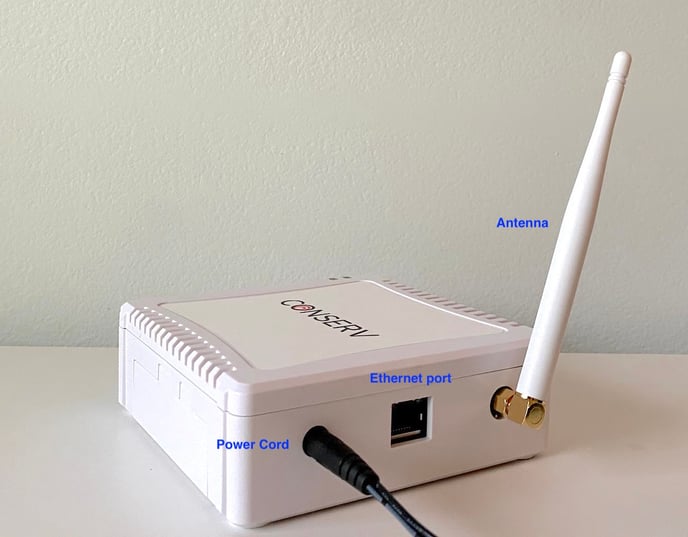
Next, screw the included antenna onto the gateway and direct it upwards. And, finally, attach the included power cord, and plug it into your power source. You should start seeing a flashing green light on the top left corner of your gateway.
Conserv's gateway is set up to automatically connect if you are in an area with good cell service or if the gateway has a hardwired connection to the internet. If, for some reason, it's not connecting, Conserv support can work with your IT team to get it sorted out. Before you contact support, though, make sure to check out these gateway troubleshooting tips.
Step 4: Find a Location for your Gateway with a Good Connection
It's a good idea to ensure that your gateway has a strong connection before connecting and placing your sensors in their final locations. You can check on this by looking at the Gateway Card:

The "Status" refers to the cellular connection. The different statuses represent the strength of the connectivity. The following table applies to 4G signal levels:
| RSSI | Signal Strength | Description |
| > -65 dBm | Excellent | Strong signal with maximum data speeds. |
| -65 dBm to -75 dBm | Good | Strong signal with good data speeds. |
| -75 dBm to -85 dBm | Fair | Fair but useful, fast and reliable data speeds may be attained, but marginal data with drop-outs is possible. |
| -85 dBm to -95 dBm | Poor | Performance will drop drastically. |
| <= -95 dBm | No signal | Disconnection |
Typically, you can improve your SIM connection if you have the gateway near an exterior wall/window. If you don't have a strong SIM connection, your gateway can still be connected via the ethernet, and the gateway card will indicate if it has an ethernet connection or not. (For example: the gateway card image above shows that the gateway is connected via the ethernet and the SIM card has a "Good" connection. If for some reason the ethernet connection failed, it could fall back on the SIM).
Step 5: Bring Your Conserv Sensors Online
Once you are ready to place the sensors, pull the plastic battery tab out of the back of the device. Within about 30 seconds you should see an orange/yellow LED on the back and hear a beep - that's the signal that the sensor is starting up, and will start sending data soon. You can do this in their intended final locations or near the gateway and then move them. After 10 minutes your data should be flowing into your Conserv Cloud account on the sensors page. You'll know the sensors are "live" if you see environmental data on the Sensor card (you may need to refresh the page) and an indication that it's updated recently:

If your sensor doesn't come online, it's possible that it is out of range of the gateway or you need to update the firmware. If the sensor still does not come online, see the article: Resolve an Offline Sensor Issue.
Step 6: Update the Firmware
We recommend updating the firmware for all of your sensors before you place them in their final location. This will ensure that they have the best connectivity once in location. Here are some instructions on how to do that.
Step 7: Place Your Sensors
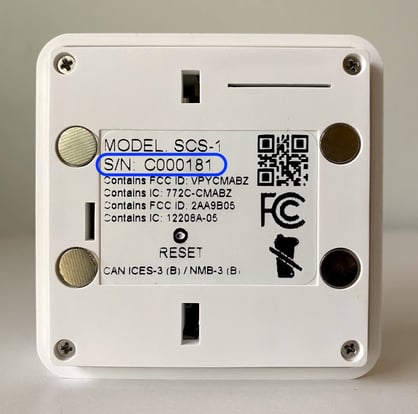
We find it's helpful to note the serial numbers (as seen below) of the sensors when you're installing them, so you'll know which sensor goes in which space.
We have provided command strips for sensor installation. We recommend these as the most secure way to mount the sensors. If you are interested in having the sensors match exhibition designs, reach out about paintable sensor covers!
Step 8: Evaluate the Range of the Sensors
If your sensors are running on the latest firmware version, you can take advantage of our range testing feature in the Conserv Cloud Mobile Application. For more information about how to do range testing, check out this article.