When you create a new space or edit an existing one within Conserv Cloud, you'll see tons of great options that can help you differentiate your spaces to their specific needs! Here's what you'll find:
To begin, navigate to your Sensors page by clicking the top icon in the left navigation panel:

Next, click the blue plus sign button in the lower left corner of the page, and select "Add a Space."

You'll now see a "drawer" appear from the right side of the page. This is your space editor! This is where you can add all of the details you need to set up this space. We'll walk you through each line item below:
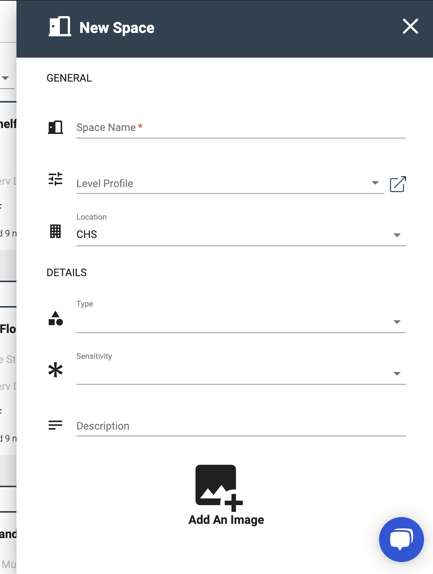
1. Space Name - This is where you can give your space its own name. Whether this is the "Dutch Gallery" or the "Paintings Vault," each space is unique, and you can name it in whatever way that's best for your institution.
Tip: “Spaces” are typically enclosed spaces such as rooms, showcases, or closed off sections of gallery spaces. If you have a showcase within a room, it’s best practice to create space for the room and a space for the showcase. It’s important that these are set up correctly because it will be crucial to how you can establish your expected levels and the analytics for pest management.
2. Level Profile - Using this dropdown, you can assign a particular Level Profile to this space. If you need to create a new Level Profile for this space, you can click the icon to the right of this dropdown menu. This will open a new tab in your browser and take you right to the Levels page.
3. Location - Does this new space reside in one of your current locations? If so, this is where you can assign it to that particular location within the hierarchy. If this space is in a new location that's not been created in Conserv Cloud yet, then you'll have to create that new location first.
4. Type - This is where it gets really fun - we've added a way for you to designate what type of space this is. Your options are: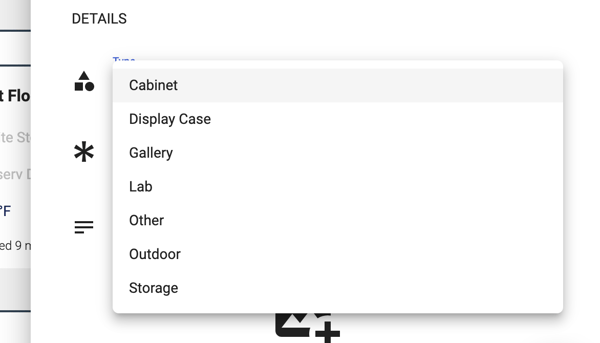
Soon we'll be adding an option in this list to create a custom space type! Stay tuned!
5. Sensitivity - Does this space require a higher level of sensitivity? Or is it a public space that doesn't need much attention? This menu gives you the option to designate how sensitive a space is.
6. Description - This is where you can provide any notes on this space that you see fit.
7. Add an image - Click this icon once and you can upload an image of your new space!
Tip: Not all of these line items are required to create a new space.
Once you've entered all the relevant information you'd like to see in your new space, simply close out of the drawer. It will save your new space into the Cloud!
Need more info on locations, spaces, and sensors? Check out these articles: