Before you Begin
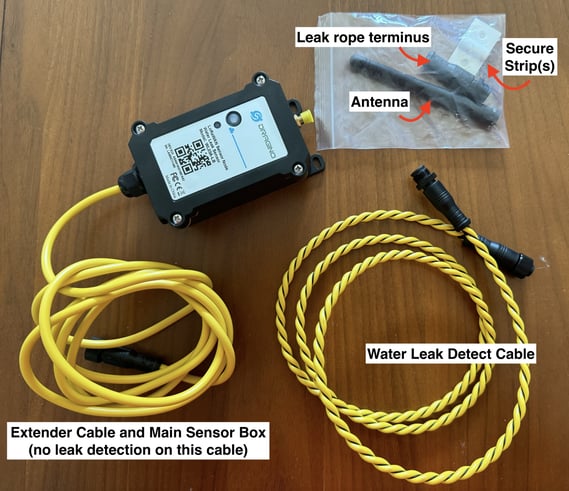
- Ensure that all of the items are included in the box before you begin the setup.
- Leak Rope Terminus
- Antenna
- Secure Strips
- Extender Cable
- Main Detection Device
- Water Leak Detection Cable
- Confirm that the new Rope Leak Detector appears in Conserv Cloud.
- Verify that the serial numbers that are on the Rope Leak Detector match the serial numbers that are listed in Conserv Cloud. If you do not see your Rope Leak Detector on your dashboard, or if the number you see does not match what you have, send a clear picture of the numbers under the QR code on the front of the device to Customer Support through a support ticket.
- Confirm that your gateway(s) are plugged in and appear in Conserv Cloud.
Set Up the Rope Leak Detector
- Remove the yellow plastic protector on the main Rope Leak Detector.
- Screw the antenna to the Rope Leak Detector.
 3. Connect the extender cable to the Rope Leak Detector matching up the holes and metal prongs and small square connector point.
 4. Add the terminus to the other end of the Rope Leak Detector cable.

6. Press and hold the connector button for three to four seconds.

A green light quickly flashes to indicate that the device is joining the network. After it connects, the green light briefly turns solid before turning off, confirming that the device is online. You can verify its connection by refreshing your Sensor page in Conserv Cloud. The sensor card indicates the status. Additionally, pressing the connector for one to two seconds creates a blue light flash, further confirming the connection. If your device fails to connect, contact the Support Team.
Install the Rope Leak Detector
The Rope Leak Detector has specific areas that are designed for wet and dry conditions.
The Rope Leak Detector cable is engineered to get wet, and it alerts you when water touches the black section of the cable.
Important
The main body of the device, which includes the antenna, should be kept dry. This component contains a lithium battery, which can be hazardous if it gets wet. When you install the device, ensure that the main unit is placed in a safe, dry location. You can use the bracket holes for wall installation or position it in an area that is expected to stay dry.
Set Up Alerts and Notifications
- Sign in to Conserv Cloud.
- Ensure that your Rope Leak Detector is online.
Set up events and alerts to trigger notifications if your rope gets wet.
Test Alerts and Notifications
Tip
The Rope Leak Detector is designed to alert you to potential water emergencies, much like a fire alarm. To ensure that it remains functional and connected, Conserv recommends that you conduct regular tests, at least quarterly, or monthly if possible.
- Dip the rope in water.
- Verify that you received an email or text notification based on your settings.
If you do not receive a notification, contact the Support Team for assistance.
Additional Resources
If you have connectivity issues with your Rope Leak Detector, contact the Support Team. Provide the following details to help them troubleshoot you faster.
- Use the support ticket form, not an email. Emails that are sent to specific team members may get lost.
- Specify which light colors flashed on the device.
- Specify the actions that you took when you saw the lights.
- Describe the troubleshooting steps that you tried and what happened after those steps, if anything.
- Provide the serial numbers of the devices that have issues.