Understand Hierarchies
Hierarchies help you set out your sensors in Conserv Cloud in a way that reflects your real-life deployment.
Conserv hierarchies have been designed to help you replicate your sensor deployment from real life into a setup that your software can make sense of. Setting up your hierarchy properly will empower you to do a number of things. For example:
- Setting up alerts at the sensor, room, or building level. This is especially useful for multi-site teams with different users responsible for different areas.
- Create reports that only takes into account specific areas. This is particularly useful for loans or temporary exhibits.
- Set up different monitoring set points and goals for different areas depending on their existing conditions and infrastructure.
- Levels will be applied based on your hierarchy setup. Levels will be most useful for your monitoring with a well-organized hierarchy.
Hierarchy View

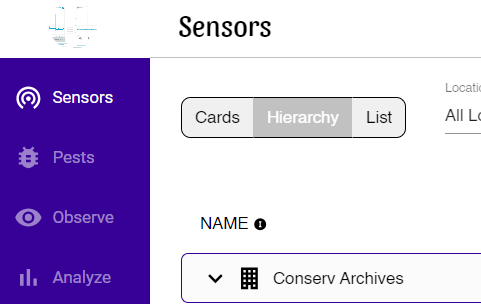
The hierarchy view can be found on the top left of your dashboard. It will be right next to the traditional card view.
Hierarchy Icons

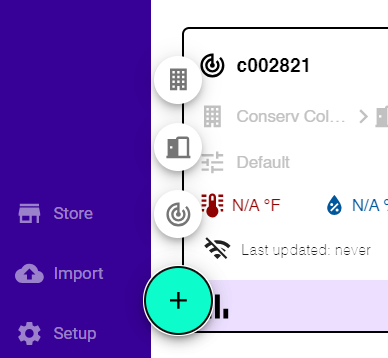
When you head down to the teal "+" button you will see three icons. The top one looks like a building, the next one down looks like an open door, and the bottom one looks a bit like a radar or like the Conserv logo.
The hierarchy within Conserv Cloud, from largest to smallest, is:
Location > Space > Sensor.
Locations
The reason we chose a building icon for locations is because this is the highest level in our hierarchy. Whether you are in a traditional museum building, outdoor heritage site, university library, or archive, you will have buildings. You may have just one, or you may have several sites. In some rare cases, sites may not even be in the same city!
Each of those sites may have floors, rooms, hallways, galleries, or offices inside them. Setting up a location is meant to help those of you with separate sites keep track of conditions (and equipment) across different buildings that belong to your institution.
Tip: When setting up your hierarchy for the first time, we recommend starting at the top and working your way down. First create your location(s), then start adding the Spaces within them. Finally, move the correct sensors into each Space.
Spaces
Within a building, you will have spaces. Spaces are much more nuanced. We chose an open door icon because “Spaces” are typically enclosed areas such as rooms, showcases, or closed off sections of gallery spaces. The reason we say "enclosed" is because that may affect how you interpret the information given by your devices.
Beyond the actual architecture, we recommend that you treat "Spaces" as areas which may be expected to have more or less homogeneous environmental conditions - this will make it easier for you to identify common patterns and detect anomalies.
This is not a rule, of course, and you may decide what your spaces in the software should look like based on your own characteristics.
Tip: If you have a showcase within a room, it’s best practice to create separate spaces for the room and the showcase. It’s important that these are set up correctly because it will be crucial to how you can establish your levels and the analytics for pest management.
Sensors
The last little icon, which looks like a series of concentric circles stands in for sensors. Here, there is an important distinction between Conserv sensors and your own.
Note: If you are paying for a Conserv subscription, you will never need to add Conserv sensors yourself. The Conserv team will add them for you once they are shipped so that you will be able to see them in your dashboard without needing to do anything on your part.
If you have new Conserv sensors, and they are not showing up automatically on your dashboard, please read this article. We may need you to send us some information to finish your setup. Do not try to add them manually yourself as this will not work.
You will only ever add a sensor if you are adding information from a sensor from a different brand where the data you are adding will be imported separately.
Unexpected Changes in Locations
When you change the name of a space or a location, it impacts all of the sensors within that space or location. Any adjustments you make in the naming of a Space or Location in an individual sensor card will have a downstream effect on the sensors in those areas.