Table of Contents
- Before You Begin
- Access the Merge Feature
- Select Sensors to Merge
- Complete the Merge Process
- Verify the Merge
- Replace the Physical Sensor
- Return or Recycle the Old Sensor
- Update Event Configurations
- Undo the Last Sensor Merge
- Troubleshooting and Support
Before You Begin
Tip
Conserv does not recommend starting merge procedures when you are pressed for time or activating new sensors and waiting a long time to perform the merge after the new sensor has been activated. This can create duplicate readings in your final merged graph.
Read all the instructions below before starting.
Understand Sensor Merges
Read this article before you start to understand what merges are, what they do, how they work, and some basic tips to help you before you start.
Confirm New Sensors Are On Your Dashboard
Double check that the serial number on the back of your SCS device is on your dashboard. The serial will look like this: c012345
If you don't see it, reach out to the Conserv Support Team, and we will add it for you.
Assign Clear Sensor Names
Assign names that correspond to the new sensors for easier merging. Conserv recommends that you create a spreadsheet with the new sensor serial numbers and their corresponding pair. You can also label each sensor with removable tape for quick identification.
Tip
Before merging sensors, add the word OLD to the old sensor so you don't mistake it. Adding NEW to the new sensor may also help.
Copy Over Old Sensor Data
The merge process takes the environmental data from the old sensor and adds it to the new sensor. The old sensor gets placed in the Inactive sensors after the merge.
Caution
The merge process does not copy over any names, descriptions, locations, or images associated to the OLD sensor.
The NEW sensor will need this information added to it manually. Conserv recommends that you copy over the details before merging.
Inactive sensors cannot be opened to show their data and will need to be made Active temporarily if you wish to access this information.
Activate the New Sensors
Activate a new sensor by pulling the tab, ensuring that you are close to a working gateway for smooth initial connection.
Allow a moment for it to connect to the gateway. You can verify the connection through the sensor card in Conserv Cloud. It may take up to 15 minutes for the sensor to show as active on the web browser dashboard.
Important
Confirm that the new sensor is online and reporting data before proceeding to the next step. Merging an offline sensor may confuse the software.
If the connection is not established after a few minutes, give the sensor a gentle shake to prompt communication with the gateway.
If you still cannot connect, follow the reset instructions.
When you reach the end of your three years or you receive a replacement sensor, you must swap your current sensors with your new ones.
Update the Firmware
It is good practice to get your sensors on the latest firmware as soon as you activate them. The update will help with range connectivity and battery longevity (amongst some other new features!). You will need to do this with a mobile device. We have instructions on how to update the firmware here.
Access the Merge Feature
- Sign in to Conserv Cloud.
- In the left navigation menu, click Sensors.
- Locate the sensor card for the old sensor that you want to merge.
- Click the three-dot menu on the sensor card.
- Select Merge with another sensor.
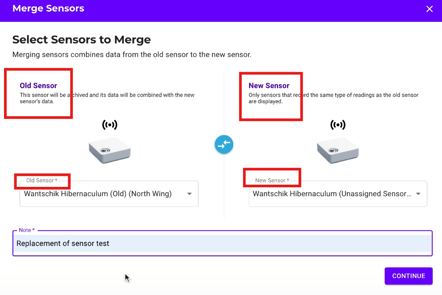
Select Sensors to Merge
- In the merge dialog, the old sensor appears on the left side automatically.
- On the right side, use the dropdown menu to select the new sensor you want to merge with.
- Verify that the old sensor is on the left and the new sensor is on the right.
Warning
Always merge sensors in the correct order. The new sensor must replace the old. If you reverse the positions or select the wrong sensors, you can undo your most recent merge yourself. For step-by-step instructions, see Undo the Last Sensor Merge.
Helpful tip
The serial number of the newer sensor will always be a bigger number than the old sensor (for example, c006500 is a newer sensor than c004200).
Complete the Merge Process
- Review the sensor information to ensure you have selected the correct sensors.
- Click Merge Sensors to begin the process.
- Wait for the confirmation message that the merge was successful.
The system will combine the historical data from both sensors into a single sensor record.
Verify the Merge
- Click Sensors in the left navigation menu.
- Change Sensor Status to Inactive to confirm that the old sensor is now in the Inactive dashboard. The old sensor should be gone from the Active dashboard.
- Verify that historical data from the old sensor is preserved in the analytics.
- Remove the batteries from the old sensor to stop it from reporting into your new sensor graph.
Replace the Physical Sensor
After the sensors are merged, and if you haven't already done this, remove the old sensor from its location and replace it with the new sensor.
Important
A merge will join the data from an old and a new sensor into the same graph.
Once the new sensor begins taking readings after activation, merge it as soon as possible to avoid a period of time in your graph when you will have live data from two sensors at the same time in the same graph.
Place the new sensor in its final location as soon as possible after a merge.
Return or Recycle the Old Sensor
Follow the appropriate procedure based on your situation:
Subscription Renewal
If you are swapping sensors due to a subscription renewal:
- Old sensor serial number below c005999: Recycle it according to local regulations.
- Old sensor serial number c006000 or above: Fill in this form so we can send you a prepaid return label. Conserv recommends reusing the packaging from new equipment to pack the old sensors. Affix the prepaid label to the box, and include the packing slip inside. Note: The prepaid shipping label must be used within 30 calendar days from the issue date, or it will expire, requiring re-issuance at extra cost.
Important
When returning the old sensors, remove the batteries and recycle them according to your local regulations. Do not include the batteries in the return package, as Lithium Thionyl Chloride batteries are considered hazardous goods and cannot be shipped loose.
Warranty or Support Issue
If you are swapping a sensor due to a warranty or support issue, follow instructions from the Conserv Support Team regarding the return of the old sensor. New sensors with support issues may need the original batteries to be kept inside the sensor. Follow Conserv Support Team instructions for these returns.
Update Event Configurations
If you had any real-time alerts tied specifically to the old sensor (as opposed to its location or space), this event will not apply to the new sensor. You will need to create a new event for the new sensor.
Undo the Last Sensor Merge
If you merge sensors in the wrong order (old on top of new instead of new on top of old), or if you merged the wrong sensors, you can undo the merge.
-
Sign in to Conserv Cloud.
-
In the left navigation menu, click Sensors.
-
Locate the sensor card for the merged sensor that was marked as new.
Remember the sensor that was marked as old will have been deleted as part of the merge process and won't be visible in the Active sensors dashboard view. -
Click the three-dot menu on the sensor card.
-
Select Merge History.
-
Click Undo Last Merge.
Both sensor cards will appear offline temporarily. Assuming they are still online and have their batteries in, each sensor will return to an online status after it checks in with the gateway.
Note
The Undo Merge feature is there to help reverse one-time mistakes. It will only undo the last merge of a sensor. It can't undo older merges that happened before that. If you need to undo a string of bad merges, you will need to reach out to Conserv Support.
When contacting support about merge issues, be sure to provide all serial numbers involved, what the mistake was, and what then desired order is. If necessary, provide datetime stamps for when each sensor should have started and stopped.
Troubleshooting and Support
Signs of a Broken Merge
- The new sensor's graph continues to report data, but the signal connectivity indicator shows that it is offline.
- The new sensor displays a continuous yellow or orange blinking light.
- The old sensor appears in the "Inactive sensors" view, but it is still reporting data into the new sensor's graph.