Before You Begin
Important
Avoid importing files into Conserv Cloud that have more than 30,000 rows. Large(r) files will still work, but they will take several minutes and are more likely to run into errors.
-
Free users are limited to files with a maximum 1MB size per file.
- Pro users may upload files up to 20MB per file.
- Conserv Cloud does not limit how many files you import.
Only the last 50 imported files are visible in the Import history. Only successfully uploaded files can be re-downloaded from the Imports page.
If you wish to download imported data that is older, please use the Export feature. Conserv Cloud does not store copies of original files older than 1 year.
Before you import your Tiny Tag data into Conserv Cloud, check your data file:
- Export your data in .csv format
- Ensure your file contains the correct date/time format
- Check that temperature and relative humidity (RH) data are included, and that you know what temperature unit your file is using
- Note your file's timezone for accurate data mapping. If your file does not specify, find out how many hours you are ahead or behind Coordinated Universal Time (UTC).
Import Process
Start the Import
- Sign in to Conserv Cloud.
- In the left navigation menu, select Import/Export.
- Click + (Import Data).
- Select TinyTag .csv as the sensor type.
- Click NEXT STEP
Upload Your File
- Drag your files to the dialog, or select the files to upload from your computer.
- Click NEXT STEP.
Check the Data Mapping
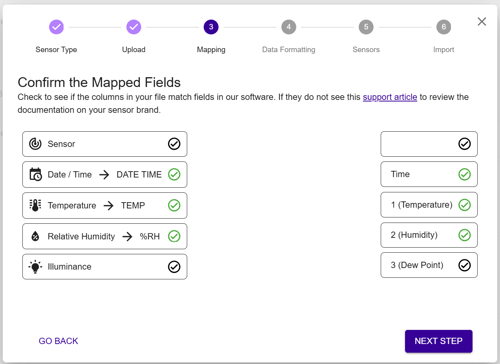
- This screen is not editable as of October 2025. You no longer need to drag and drop the fields from left to right. Double check that the mapping looks correct.
- Click NEXT STEP.
Verify Data Format and Configuration
Ensure your data follows the correct format:- Check that the Day, Month, Year, Hours, Minutes and Seconds or AM/PM match your sample reading exactly.
- Check your Temperature is °C or °F. This may not have identified correctly or may have changed. This is not a preference setting. You must match the unit in your original file for the readings to come out correctly in the graph. To change your personal unit preferences, see this article.
Configure Time Zone
- Select your time zone from the available options.
- If your data is recorded in a different time zone: Note the UTC offset for accurate data mapping. For example, Mountain Standard Time in the United States is UTC-7.
Caution
The time zones in the dropdown list are all Standard. They do not take into account Daylight Savings practices in various countries. Please keep this in mind when you pick the number of hours difference from UTC to match your readings. You may need to pick a location that is not yours in order to match the correct hours offset.
Complete the Import
- After confirming your Time and Temperature configurations, click NEXT STEP.
- Name your sensor and choose a Sensor Action (Create new sensor or Merge with existing sensor). If merging, select the sensor you are merging into.
- Wait. You will get a window telling you the import file is being processed in the background.
- Click FINISH.
You will get a confirmation email from noreply@conserv.io when the import is done. Check your spam if you do not see it. - The import process will re-direct you to the main Sensors page. Go back to the Import/Export page using the left-hand navigation menu to check on your import. It will show a Not Run status with a cross icon until it finishes. This will change to a checkmark when it finishes. Large files may take several minutes to import. Refresh the page to see the final status after the email is received.
- You may need to refresh the Sensors page to see the newly imported data.
Known Issues
Error rows
Any files that contain empty rows with the text "Logged" at the beginning or end of the file may appear as errors. They are counted as Error rows in the Import history.
While this does not affect your data import, you may choose to delete these rows before importing to avoid seeing the Error rows in your import history. This issue will be addressed in a future update.
Create and move into space does not work
We are aware that the Create and move into space option at the end of the import process is not working at this time.